Welcome to GRINspiration, the online magazine for self-publishers and aspiring authors! From academic papers to fantasy novels: here you'll find tips, tricks, and insights to help you successfully write and publish your work.
Adjusting headers and footers in Word: How it works!
Learn how to quickly and easily create and edit headers and footers in Word, as well as what to keep in mind when doing so.
First things first:
Use automatic headers and footers to improve your text’s readability.
Headers and footers provide orientation but should not be overloaded with information.
If headers feel like a hassle and you’d rather do without footers altogether, you might have tried integrating them manually into the main text. However, Microsoft Word offers many useful automation features, while manual layout adjustments can sometimes be tricky. To save you time and frustration, we’ll show you how to work with headers and footers and, for example, automatically insert chapter headings into the header.
All tips provided here are based on the latest version of Microsoft Word, available in Office 365 and Office 2019.
How to insert headers and footers
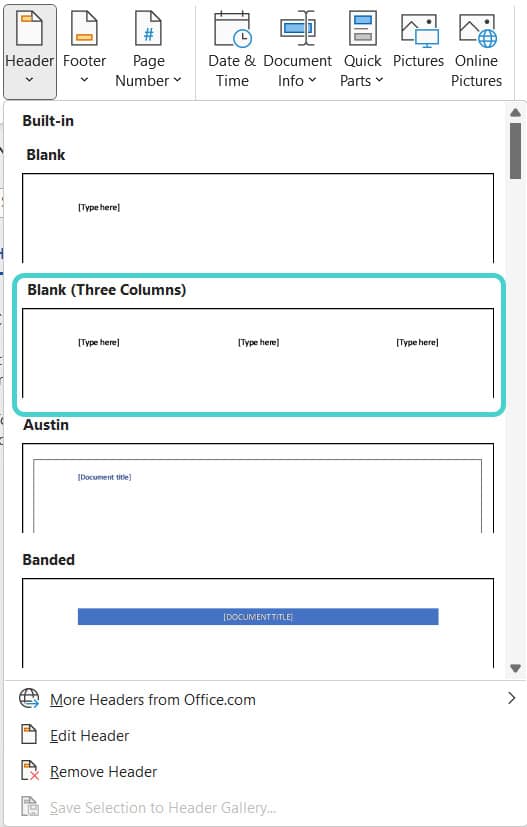
The function to insert automatic headers, footers and page numbers can be found under the “Insert” tab:
Click on the respective dropdown menu and choose a layout you like. The most versatile option is the “Blank (Three Columns)” template, as it provides the most flexibility. You can delete unused fields easily. Your selected element will then be inserted with one click.
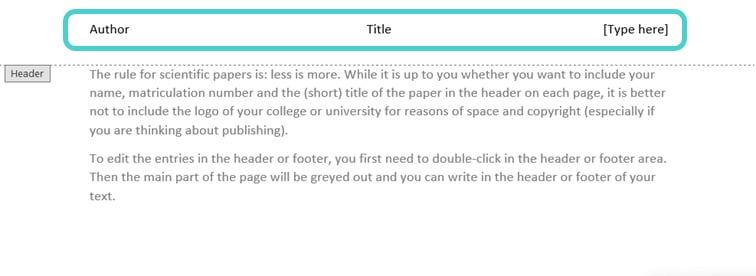
When it comes to scientific papers, less is more. Although it is up to you whether you want to insert your name, matriculation number and the (short) title of the thesis in the header of each page, you should rather do without the logo of your college or university for reasons of space and copyright (especially if you are thinking about publishing).
To edit entries in the header or footer, double-click in the respective area. The main page content will then be grayed out, allowing you to write directly in the header or footer.
For the font, it’s advisable to stick with Word’s default formatting styles (“Header” or “Footer”) or use a smaller font size (e.g., 10 pt) similar to footnotes and endnotes. While working in the header or footer, Word also activates the “Header & Footer Tools.”
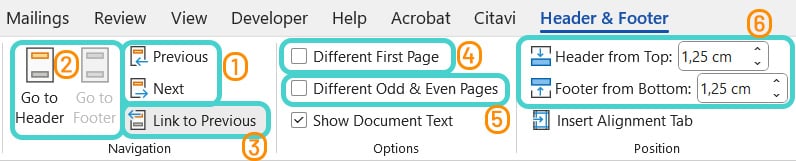
Here you can:
switch between section headers and footers
switch between header and footer section by section
use the same header or footer for multiple sections or define new options for each section
you can define a different looking header or footer for the first page of each section with the “Different First Page” option
you can insert different headers and footers for right and left book pages respectively with “Different Odd & Even Pages” option
you shouldn’t change the position or size of your headers and footers because the distances from the top or bottom of the page are adjusted in such a way that the margins allow for printing
Usually, the title page of a scientific paper doesn’t contain a header or footer, and thus, no page number. To set this up, there are two options:
You can either insert a section break after the title page and let the header and footer start with the second section – in this case switch off “Link to Previous”. This option makes more sense for longer texts, in which you use several pages without headers and footers.
Otherwise, you can simply activate “Different First Page” without using a section break – this leaves the first header or footer empty. Both methods can also be combined, e.g. to differentiate the first header of a section from the rest.
Chapter references in the header: 3 quick steps
Including the current chapter in the header gives your text a professional layout and improves navigation, allowing readers to instantly see which section they are in. To make headers automatically reference chapter titles, follow these simple steps:
Assign the appropriate style
If you haven’t done so already, assign a style to the headings you want to appear in the header. The best choice is the “Heading 1” style for main headings. Alternatively, you can reference different heading levels for each section (e.g., “Heading 1” in one section and “Heading 2” in another). Separate sections with section breaks and disable the “Link to Previous” option as needed.
Select “Quick Parts” in the Header & Footer Tools
Double-click in the header area to access the Header & Footer Tools. Click where you want the chapter title to appear, then navigate to the “Quick Parts” menu on the left:
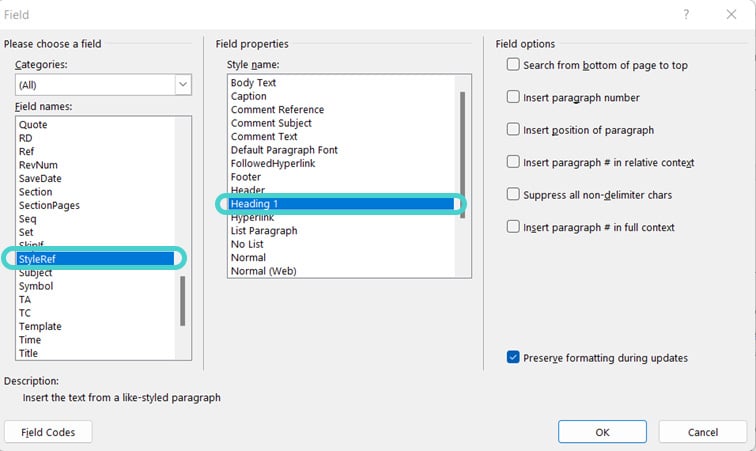
Scroll to “StyleRef” under “Field Names” and choose the style assigned to your headings.
Select Field and StyleRef
Under Quick Parts, select “Field” to open a new window.
That’s it! A dynamic reference to your chosen heading style will now appear at the cursor’s position, automatically updating with the current chapter title.
Did you know?
Typographers agree that aesthetically balanced margins significantly improve readability and enhance focus on the text.
In typography, the header is called the “head margin,” which refers to the unprinted space between the text and the top edge of the page.
Its counterpart is the “foot margin,” located at the bottom of the page.
If you already have your own photo or design – or at least a very clear idea of what your book cover should look like – perfect! We’ll take care of the design process and send you several drafts to choose from.
Don’t have a cover idea yet, or would you like us to include your author photo on the back of the book? No problem at all. Based on your book’s description, we’ll search for suitable visual concepts and design your individual book cover – including your author photo on the cover – creative, professional, and tailored to your story.
Need some inspiration? Here are some of our finest covers:
Softcover or Hardcover
The choice is yours: decide between a classic softcover edition or a premium hardcover binding. We’ve summarized the key advantages and disadvantages for you:
Softcover
Hardcover
Production Costs
Lower than hardcover, allowing for a more attractive retail price
Higher production costs, which result in a higher retail price
Format
Lighter, fits more easily into your bag, and is more convenient on the go
Heavier and bulkier, therefore less suitable for travel or casual reading
Perceived Value
Feels less premium and is less eye-catching than a hardcover
Creates a high-quality impression, better suited as a gift or collector’s item; appears more prestigious
Durability
Corners bend more easily and the spine may break sooner
More durable cover, better shape retention, and improved protection for the pages
Layout check
We check your text for readability and printability (Are the margins sufficient for printing? Is the font size easy to read in print? Is the line spacing right? Is the resolution of the illustrations sufficient for good print quality?), embed the fonts if necessary and take care of automatic page numbers and a table of contents.
Publication as e-book and ISBN
With each publication, you will receive an ISBN number for your e-book and print book.
Worldwide distribution
With each publication, you will receive an ISBN number for your e-book and print book. We deliver your book to our worldwide distribution network: over 300 online shops.
Appealing blurb
We will write you a blurb that arouses curiosity and emotions – and convinces readers. Perfectly tailored to your genre and target audience.
Personal contact
Benefit from our many years of publishing experience: We support you with our know-how from upload to finished book. With us, you will get a personal contact person, we will guide you step by step through the entire process and are there for you.
Cover Service
Do you already have your own photo or motif or at least a very concrete idea of how you imagine your book cover? Perfect! We will take care of the creation and send you two to four drafts, from which you can choose one.
You don’t have a cover idea yet or would like us to include your author photo on the back of the book? No problem. For an extra charge of €50, our graphic designer will search for motifs and design your individual book cover including an author’s photo on the book cover – creatively, professionally and matching your story.
Need some inspiration? Check out some of our favorite covers!
Layout Deluxe
Your book, perfectly staged: With professional typography, stylish book typesetting and design templates that fit your project, we ensure an all-round coherent reading experience. Whether classic or individual – we design your book the way your story deserves it.
Fee overview
Each sale of your title will be remunerated according to the following table.
You will receive your royalties on top of the publisher's selling price. The table has been valid since 17.04.2025, 12.30 p.m.
Fee on e-book sales
www.grin.com50%
Amazon Kindle, iBook Store, Google Play, Ciando,
Pubbles, Libri, Genios, Other Distributors30%
Fee on book sales
www.grin.com50%
Book trade (BoD and Amazon Marketplace)30%
The publisher's selling price is the sales price excluding the statutory value added tax as well as less trade discounts, production and shipping costs.
The selling price can be determined individually by the respective dealer, unless the nationally bound selling price is required by law (book price fixing).