First things first:
- Headers, footers, footnotes, endnotes, and indexes can all be fully automated in Word.
- The formatting of headers and footers largely depends on the type of breaks and paragraphs used.
Microsoft Word offers automatic features for inserting tables of contents, lists of figures and tables, page numbers, footnotes, and even bibliographies. Don’t hesitate to use these valuable tools—they save time and effort, especially when last-minute corrections are needed. Automations adapt flexibly to any subsequent changes, making them particularly useful.
All tips are based on the latest version of Microsoft Word, included in Office 365 and Office 2019.
Automatic Page Numbers and Managing Section Breaks
To insert page numbers, navigate to the “Insert” tab and click on “Page Number” under “Header & Footer.”

A quicker way to achieve the same result is to double-click in the footer of your document. This opens the Header & Footer Tools menu, where you’ll find the “Page Number” option on the far left.

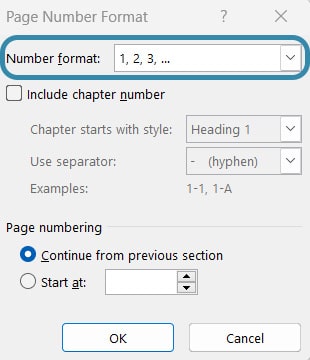
Open the dropdown menu to choose where to place the page numbers. For publishing on GRIN, we recommend selecting “Bottom of Page” and “Centered.” You can also format the page numbers, such as choosing the number format—Arabic or Roman numerals, uppercase or lowercase, or even including chapter numbers.
Want to change the page numbering format or restart numbering from a specific page?
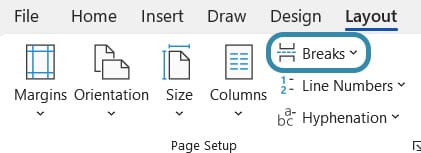
Insert a section break under the page where the numbering should change (e.g., after the table of contents, if the introduction starts with page 1). Go to the “Layout” tab, then select “Breaks” > “Next Page Section Break.”
Next, double-click in the footer of the page where the new numbering should begin. In the Header & Footer Tools menu, unlink this footer from the previous section:

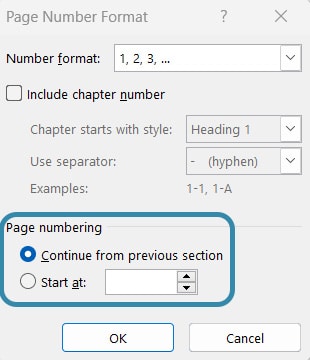
Once unlinked, you can adjust the page number format by selecting “Format Page Numbers” and setting it to start at your desired number (e.g., “Start at: 1”).
You might also be interested in these articles:
Footnotes vs. Endnotes
Footnotes or endnotes are used for annotations, further explanations, translations, or citations of sources mentioned in your text. With automatic footnotes or endnotes, post-editing is seamless—Word ensures that footnotes remain on the same page as their referenced text and automatically updates their numbering. The difference between footnotes and endnotes lies in their placement: Footnotes appear at the bottom of the relevant page. Endnotes are consolidated at the end of the document or at the end of a chapter. Since endnotes can interrupt the reader’s flow, footnotes are generally preferred for academic writing. Alternatively, you can insert citations directly into the text in parentheses. Whichever method you choose, ensure consistency throughout your document (unless your institution provides specific guidelines).
Adding Automatic Footnotes or Endnotes
To add a footnote or endnote, place your cursor where you want the reference mark to appear. Then go to the “References” tab and click “Insert Footnote” or “Insert Endnote.” Word will automatically insert the corresponding note at the bottom of the page or at the document’s end, where you can type your annotation or citation.

Rules for Footnotes
DIN 5008, the German standard for text formatting, provides some rules for footnotes: Footnotes should be numbered consecutively throughout the document with Arabic numerals. The font size of footnotes should be smaller than the main text and use single spacing. For instance, if your main text is in 12-point Times New Roman, footnotes should be in 10-point. Footnotes are considered complete sentences and should end with a period.
Sometimes there is confusion about where the footnote number should be. Here, too, there are clear rules: If the note or the source refers to a word or phrase, put the footnote directly after it[1] – without spaces and even if it is immediately followed by a punctuation mark[2]. However, if the footnote refers to the entire sentence, the footnote number is placed after the punctuation mark at the end of the sentence.[3] For direct quotations, always place the footnote directly after the “closing quotation mark”[4].
[1] Example 1.
[2] Example 2.
[3] Example 3.
[4] Example 4.
Automatic Tables of Contents, Figures, and Tables
With an automatic table of contents, Word transfers all existing chapters into a clear index. You can also refresh the index at any time to see the correct page numbers.
To create an automatic table of contents, your headings must be formatted with the styles “Heading 1” through “Heading 9.” You can find these styles under the “Home” tab and customize them by right-clicking and selecting “Modify.”

Structure your headings logically: you should mark your main headings as “Heading 1”, the next lower level as “Heading 2”. Although Word allows up to nine heading levels, it’s best to limit your table of contents to the first three levels for clarity.
By the way: the shortcut for the first heading level is Alt + 1, the shortcut for the second Alt + 2 and Alt + 3 for the third.
Once your headings are formatted, go to the “References” tab and click “Table of Contents.” You can choose one of Word’s predefined layouts or create a custom table of contents.

Here, you can select one of the built-in table of contents styles or use the “Custom Table of Contents” option at the bottom to customize its appearance. Word’s default table of contents only supports up to three heading levels. If you want to include additional levels, you can adjust this in a custom table of contents.
Have you made changes to your text afterward, causing the page numbers to shift? No problem! Simply right-click on the existing table of contents and select “Update Field.” You can choose to update only the page numbers or the entire table if you’ve also made changes to the headings.
Figure and Table Lists: Not Rocket Science!
The process for creating lists of figures or tables is similar. Right-click on an object (e.g., an image or table) and select “Insert Caption.”
In the dialog box, choose a label such as “Figure,” “Fig.,” “Table,” or “Tab.” and specify its position.
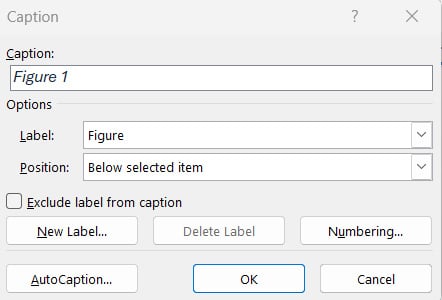
Once all objects are labeled, go to the “References” tab and click “Insert Table of Figures.”

Be careful with long index entries: If you have used a label that also contains the source of an image, for example, it will be completely included in the index. You can move the source below the image and outside the actual caption into a separate paragraph so that this part is not included in the index.
You can also update the page numbers for the table of figures or list of tables at any time.
Organization is Key: The Automatic Bibliography
You can also automate the management of your references and citations in Word, which is especially helpful for longer papers. Word supports citation styles like MLA, Chicago, APA, and IEEE, automatically adapting your bibliography to the chosen standard. To add a citation, go to the “References” tab and click “Insert Citation.”

You can either input all the source details immediately or create a placeholder to fill in later. Previously entered sources can be reused with a single click. To insert the bibliography at the end of your document, use the “References” tab and click “Bibliography.” With these tools, your formatting struggles are a thing of the past!

Further links on the topic:
Sources:

