First things first:
- The following applies: well-formatted text = a clean layout
- Shortcuts make formatting and writing more efficient.
- Format your text either before you start writing or when you’re done writing.
You’ve finished writing your term paper, and now it’s time to make the text look appealing and add useful features like an automatic table of contents. Have you ever caught yourself repeatedly searching for the page break function or scrolling through all the style templates to find the right one for headings? For such cases, we’ve compiled a few shortcuts to save you time in the future.
But there are even more ways to simplify your formatting work—some are especially helpful if the text is already written, while others can be used before you type the first word.
All the tips we share here are based on the latest version of Microsoft Word, available in Office 365 and Office 2019.
1. The most useful shortcuts
These shortcuts refer to the Windows operating system – for those who use Mac OS, other shortcuts apply. You can find them here.
General functions
- CTRL+S – save document
- CTRL+X – cut selected content
- CTRL+C – copy selected content
- CTRL+V – paste copied or cut content
- CTRL+A – select entire text including all contents (tables, figures, etc.)
- CTRL+Z – undo last action
- CTRL+F – displays the navigation pane where you can search for content in the document and view the previously selected heading levels
- Shift+F3 – switches between upper and lower case and capital letters
- This is particularly handy for long words or words in foreign languages, which you might otherwise have to retype – try it out!
- CTRL+ALT+F – inserts a footnote
- CTRL+Q – removes the formatting of the selected paragraph
- You can also find the button for this function in the “Home” tab under “Font” in the very top right – the icon shows the letter A with an eraser
Functions for formatting headings
- ALT+1 – applies the Heading 1 style to the selected text
- ALT+2 – applies the Heading 2 style to the selected text
- ALT+3 – applies the Heading 3 style to the selected text
- CTRL+Shift+N – applies the Standard style to the selected text
Functions for inserting special styles
- Shift+Enter – inserts a soft line break
- CTRL+Enter – inserts a page break
- CTRL+Hyphen – inserts a nonbreaking hyphen
- CTRL+Shift+Space – inserts a nonbreaking space
Of course, there are many more shortcuts that you can use in Word. You can find a full list here: https://support.microsoft.com/en-us/office/keyboard-shortcuts-in-word-95ef89dd-7142-4b50-afb2-f762f663ceb2.
2. Searching and replacing formatting
This feature is especially useful once your text is written, and you want to review your formatting. With Word’s advanced search, you can quickly locate not only words, phrases, or abbreviations but also fonts, indentation settings, line spacing, or page breaks.
You can access the advanced search feature under the “Home” tab in the “Editing” group. Click the small arrow next to the “Find” button:

A new window will open for advanced search options. Here, you can refine your search for a specific word or phrase, or use the two lower buttons, “Format” and “Special”, to search for formatting.
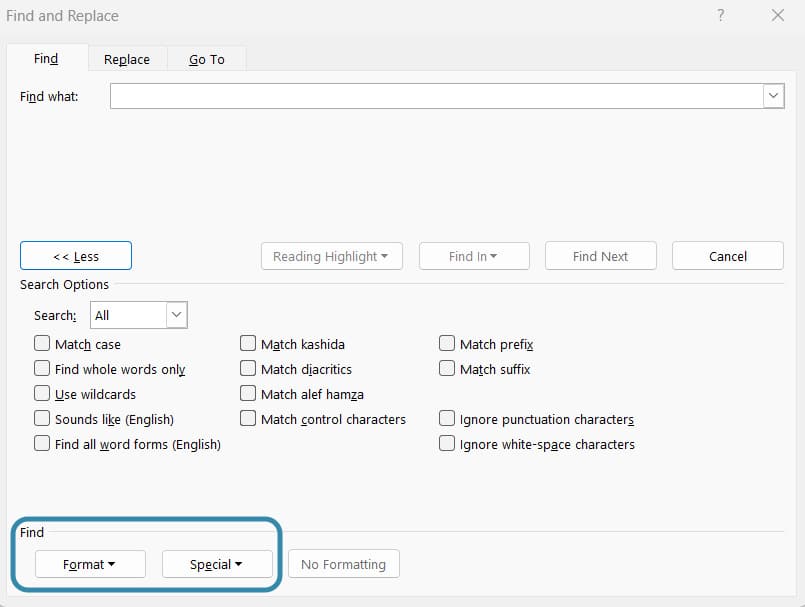
Under “Format”: Find and Replace Character and Paragraph Settings
In the “Format” menu, you’ll find options like “Font…” and “Paragraph…”:
Font… opens a window similar to the one used for formatting text. Here, you can search for specific font styles. For instance, if a rogue Calibri sneaked in while the rest of your text is in Times New Roman, you can locate and fix it. You can also search for bold, italicized, or underlined words (did a formatting carryover from copying escape notice?), small caps, font sizes, or text colors.
Paragraph… opens a window resembling the one where you adjust indentation and spacing. You can search by any paragraph settings, such as line spacing (did you overlook an inconsistent spacing?), text alignment (is there a section that’s still left-aligned?), or spacing and indentation settings.
Searching for Special Formats
The “Special” button allows you to search for specific formatting elements like:
- Page breaks
- Section breaks
- Soft line breaks
- Optional hyphens
- Non-breaking spaces
Replacing Found Formatting
Once you’ve identified formatting issues, you can replace them with alternatives if they’re no longer needed. For example:
You notice that soft line breaks don’t make sense in certain places. Use “Special” to search for manual line breaks. Then, go to the “Replace” tab in the same window. Here, you can define that all manual line breaks should be replaced with standard paragraph breaks (Special – Paragraph Mark). The process will look something like this:
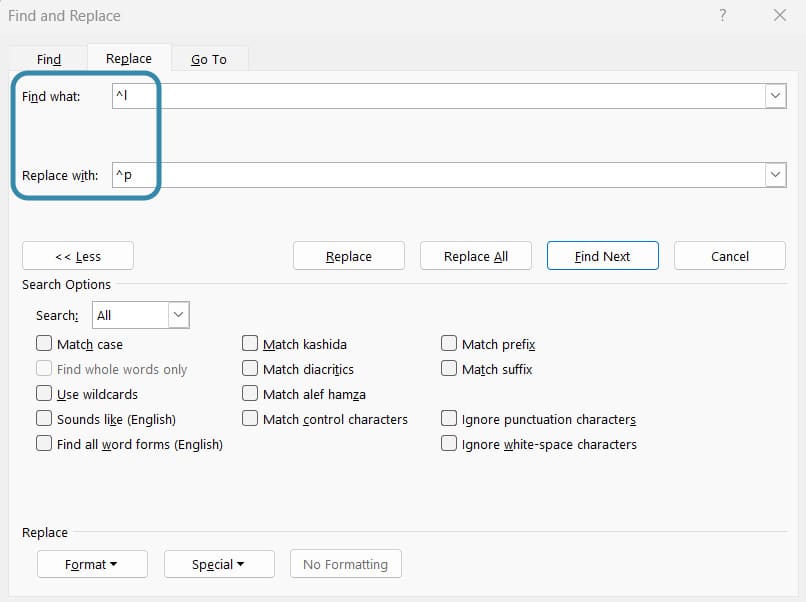
This feature is also useful if you feel like you’ve gotten a little bogged down with your section breaks or page breaks: just replace them with paragraph marks and start over.
You might also be interested in these articles:
3. Styles: Good for the final check
Style templates help give your layout a consistent structure. They also save time, as templates combine multiple formatting settings into one, so you don’t need to manually apply the same adjustments repeatedly. Want your main text to always have the same line spacing and a 6-point space after each paragraph? Simply adjust the “Normal” style template in Word. Here’s how to do it and how to check for any inconsistent formatting in your document at a glance.
Where to find the styles and how to use them
You’ll find style templates in the “Home” tab, to the right of the paragraph formatting tools:

You can also display them alongside your document by clicking the small arrow icon in the bottom-right corner. This list view is more comprehensive, as it shows more templates. To apply a style, simply highlight the section you want to format and click on the desired template.
How to Modify Style Templates: Two Methods
If you want to adjust the font, size, color, or paragraph formatting of a style template, you can do so as follows:
Right-Click Method
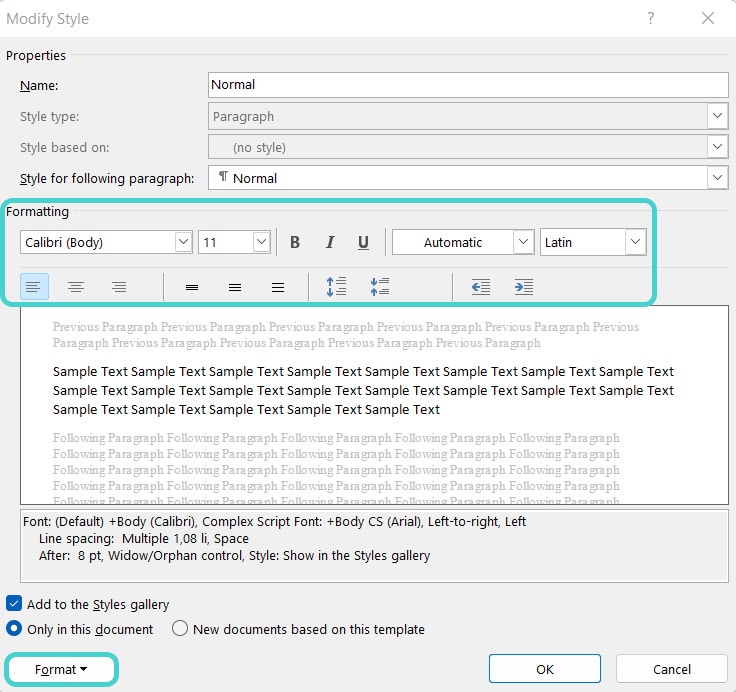
Right-click on the style you want to edit and select “Modify”. A new window will open: In this window, you can rename your style, change font and text formatting settings, and use the “Format” button in the bottom-left corner to access paragraph settings, such as line spacing and paragraph spacing.Update to Match Selection Method
Another way to modify an existing style is to format a section of text to your liking, then right-click the style template and select “[Style Name]: Update to Match Selection”. This updates the template to include your new formatting.
How to see all the formatting used in the document
To review all styles applied throughout your document, display the style list by clicking the arrow icon next to the styles pane. Then, open the “Options” menu:
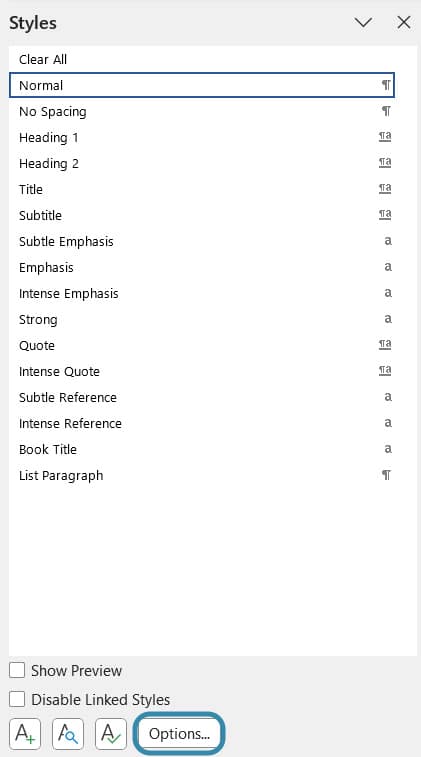
Here, you can view all styles used in your document and choose a sorting option—we recommend alphabetical order for clarity.
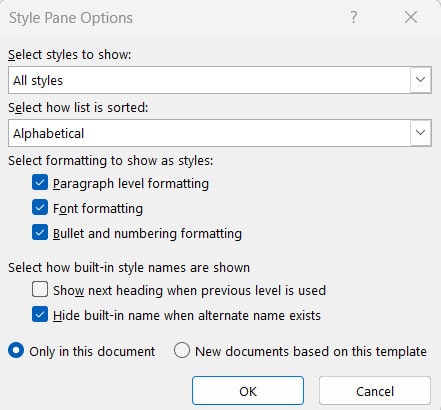
Be sure to check the first three boxes to ensure all formatting details are displayed. Confirm with “OK” and scroll through the styles to identify inconsistencies.
In a nutshell: Formatting made easy
As you can see, Word offers several ways to simplify formatting. Here’s a quick recap of three key tips:
- Learn 5 Shortcuts you’ll use frequently and make a habit of using them. You’ll notice formatting becomes much faster.
- Either finish writing your text before formatting or set up styles before starting. Tweaking formatting while writing interrupts your flow and creates double the work.
- Review your styles after formatting to clean up inconsistencies and ensure a cohesive layout.
Do you like our magazine? Then sign up for our GRIN newsletter now!


